Showing posts with label Crafts. Show all posts

Thursday, February 21, 2013

Semi-Homemade Minky Blankets

Last year I made several minky blankets for babies.  The first one was for my niece.  This blanket actually was not semi-homemade but SO easy.  I bought about 1 1/4 yards minky fabric and 1 1/4 yards of a cute pink cotton fabric.  I wanted it to be a little larger than your average baby blanket so I used the full 1 1/4 yards, cleaning up the cut edges so that they were straight. 

Pin the fabric right sides together, surge or zigzag around the perimeter, pulling out the pins as you go and leaving a small opening.  Pull the fabric inside out through opening.


Tuck the openings raw edges under to match the rest of the sewn edges and pin shut.  Sew again using sewing machine single stitch around perimeter again about 1/4 or 1/2 inch from edge.  And you are done.  That is about as easy as it gets.


The next blankets I made in a hurry I was invited to a baby shower for a friend having twins, and  didn't want to spend the time and money buying the minky so I ran to Ross to pick up some inexpensive baby blankets $4.99--which is a steal for minky and the blanket binding. Her nursery colors are blue and green.  I found two matching bright blue blankets, ran to hobby lobby next to pick up some green fabric and thread and went to work.

 
First I unpicked the blanket binding from the Ross blanket.
 
 
Next I cut my fabric to the same size as the minky blanket and pinned them to gether this time wrondg sides together, because the binding covers the raw edges.  Here you can stitch or surge  the fabric and blanket together for a stronger hold.
 
 
Next wrap the binding back around the blanket as before and pinning in place on one side.
 
 
Next flip the blanket over and pin again.  The goal is to make sure that the binding does not move and is fitted evenly to both sides.
 
 
Next topstitch carefully along the same lines as the binding was sewn on before. I ending up using blue thread and not the green pictured, I am not the best at sewing straight and my lines did not show up as much using the matching thread.
 
 
Then I folded the blanket and put it back on its original hanger, and it is now gorgeous and one of a kind, well in this case,  two of a kind.
 
Happy Sewing!


Saturday, June 2, 2012

Copycat Gymboree Hair Curlies

Hello!  It is been a while since my last post.  I have been having bad luck with my pictures lately, and nothing is quite blog worthy.  I've been playing around with the manual settings on my camera and my pictures have been either too dark or over-exposed-- and of course just as I am finishing up a project the battery in my camera dies or I realize that my CF Card is not in my camera.  Ugh!  And as you all know first hand May is a crazy, busy month, with end of school programs, spring soccer and baseball games finishing up, it feels like I haven't had time to breath.  But enough whining, I SO admire all of you who can balance crazy schedules and blog at the same time!  Blogging is definitely not easy!

On to this week's tutorial... I finished up several pairs of these hair bows the other day and wanted to share them with you!!  One of my favorite stores to shop for my kids is Gymboree, I LOVE their matching accessories!!  I can't always afford to buy them however so I decided to make a few sets of copycat bows myself.   I love how they turned out and they are SO Easy and inexpensive!


Supplies:
  • 2 (or more) spools of 1/4 in Grosgrain Ribbon (also from Joanns)
  • 8 3/8 in Dowels (found mine in a 10-12 pack at Joanns for $1)
  • Clothespins
  • 2 Hair barrettes($ store) or alligator clips
  • Glue gun - or heavy duty craft glue
  • FrayCheck or other Anti-Fray product

Start by spinning your ribbon (from the spool) around the top of a dowel - hold in place using a clothespin.  It should look like this:

Keep wrapping ribbon around your dowel until you reach the bottom.  Use another clothespin to secure the ribbon at the bottom and cut.
Repeat this process 7 more times on other dowels--using two or more different colors.  If using more colors just make sure you have an even amount so that your bows match.  Spritz dowels with water.  Place dowels on a foil lined cookie sheet, and bake in the oven for 20-25 minutes at 225 degrees. 

Once baked the ribbons will stay in a ringlet form.  Remove from dowels and trim ends. 
Cut each length into 4 equal pieces. Apply FrayCheck to ends.

You will need  use 16 pieces for each bow--or 8 of each color.  You will also need a two inch extra piece of ribbon to tie the ribbons together in the center.  Stack the ribbons together and smooth flat in the middle of each ribbon --until all together.  

Use your extra ribbon piece to tie together the centers of all ribbons. It should look like this:

Use your hot glue gun to glue inside of knot to a hair barette, and wrap excess around the barrette. Also secure with hot glue-- and for extra security you could also stitch these end pieces together with a needle and thread.

Repeat this process for second bow, and they are ready to be worn!
And that's it!  Easy Copycat Gymboree Hair Curlies at a fraction of the cost. 

Below are pictures of a couple of other curlies I made.  The color possiblities are endless!!


So fun!  My daughter will be wearing the pink and orange bows to my nephew's -- pink and orange themed wedding!
I love them! Do you?


Linking to:

Thursday, February 9, 2012

PIY Damask Pillows


PIY stands for Print It Yourself

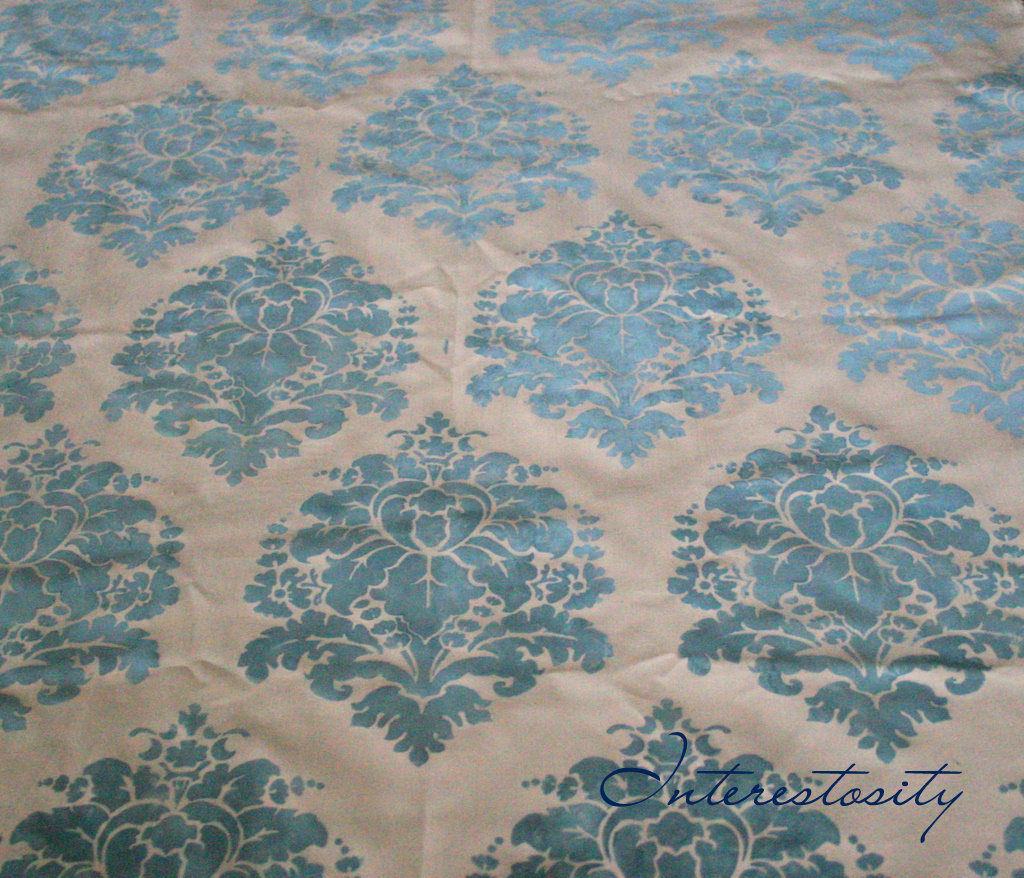
Hurray!  I am back and I have an awesome tutorial for you!!  It is how to print your own fabric!!  For the last little while I have been searching and searching for the perfect fabric.  The challenge, was that nothing was within my budget.  I have no desire to spend hundreds of dollars on the perfect fabric.  So instead,  I am obsessed with printing my own fabric and checked out every book on the subject from my local library.

There are many ways to print your own fabric, most of which use stamps or making your own stamp using a lino block.  But did you know you can also print using stencils?  Well, you can and here is how you do it!!


The secret is using "block printing ink."  The ink that I used is a Speedball Block Printing Ink Set   You can buy block printing ink at most craft stores.  I bought mine at Hobby Lobby using a 40% off coupon.  I also bought my stencil at Hobby Lobby using a 40% off coupon (different trip.)  The price on the stencil was $2.99 before the coupon, the individual inks are $4.19 before coupons.   There are other fabric inks that you can buy and if you are doing a large project it is more economical to buy large bottles of ink! 

My fabric is a light gray poly/cotton mix(guessing) that I bought from WalMart, at an easy $1.50 a yard.  Have you ever looked through WalMart's "Undetermined"  fabric?  Its kinda fun.  I will do a post on that soon too, as it is another great way to save money on your craft projects.  So here we go...

How to Print Your Own Fabric:


Supplies:
Fabric
Sponge
Stencil
Block Printing Ink
Iron
  
  1. Prewash and dry your fabric!!  Don't forget this step!!  This will help the ink sink into the fabric better.
  2. Mix your block printing ink.  I used a combination of white, blue and black to make a light gray blue.  I used almost a full tube of white to do just over a yard of 55in fabric.  To get the most uniform look try to mix up as much ink in the beginning as possible, because unless you measure or keep track of the exact mix it may be difficult to match your first color.  Also the ink WILL dry lighter than your original color mix and some WILL wash out.                                                        
  3. Once mixed, keep your ink covered, I used a small plastic bag to cover, in between ink dips.  It dries quickly.  Also you can help this by adding TINY amounts of water(and I mean like small drips) .  Just be careful not to use too much or your print will wash out or bleed all over your fabric.  Another good reason to start with $1.50 a yard fabric--at least until you get the hang of it!
  4. Tape your stencil onto your fabric or use a stencil adhesive. 
  5. Dab your sponge into the ink and blot it to get most of the ink off of your sponge before applying it to the fabric.
  6. Gently blot the sponge with ink into the fabric.  I applied my print by hand, and eyeballed where to put each stencil.  You can make your design more uniform by using a grid in disappearing ink before applying your design.                        
  7. Pick up the stencil and move your stencil to the next spot and apply again. If the stencil overlaps any previous design make sure it is dry before applying.
  8. Apply your design over the entire fabric let it dry to the touch, and then heat set it.  Either by putting the fabric in the dryer for 10 to 15 minutes or ironing the opposite side for several minutes. Make sure to use plenty of heat so that the ink does not wash out!

    Once the fabric is heat set you can wash it or cut and use for any project.  Make sure to use plenty of heat so that the ink does not wash out!  To wash use the hand wash setting on your washer.  Plan on some color variation depending on how well the ink was mixed.


     This is a great way to create your own fabric designs.   I like using ink better than fabric paint, or a fabric medium/paint because the texture, once washed, feels just like the original fabric.
Yea!  At a $1.50 a yard plus supplies, options are endless!!  It is easy, fun and beautiful!! 
I made my fabric into some quick and easy pillows...

Cut 2 18.5" x 18.5" squares. Sew fabric right sides together leaving a fist sized whole open, pull the fabric inside out and stuff with filler Use your sewing machine to stitch the opening together and VOILA!  So easy and gorgeous!


What do you think?  Are you going to try this?  I would love to see what you do with your own fabric!

Happy Printing!

Tuesday, December 20, 2011

Girl's Rosette Earrings

So today I have to start by saying how amazed and grateful I am that my little blog now has reached 66 followers!  I am humbled and happy to have you here visiting with me!!  Thank you for your kind comments and new friendships!! 

Today I have a new earring idea for you!  These are cute, so simple and inexpensive!  They would be perfect for last minute stocking stuffers or gifts for girls!  Aren't they cute!!  Thank you to my awesome nieces for modeling them for me. 


Your Supplies:
Acrylic Paint
Glaze with black paint or Martha Stewart Metallic Glaze (black coffee color)
Painting Sponges
Earring Hooks
Extra wires for dipping

Metal covered plastic beads (I bought these at Hobby Lobby for 50% off  for $1 but regular price they are $1.99 for 9)


To make the pink glazed earrings I just followed the step by step using the Martha Stewart glaze instead of the black/glaze mix and this tutorial.


To make the turquoise earrings I first dipped straight into the paint tube.


Shake the excess paint off and let them dry.   If I were to do this again, I would have taped off the top loop to show the metal instead of blue.


Once they were dry I scraped the edges and top loop with a razorblade.

And... tada...


Or you can just put the charms on a hook -- no work required!


Now for the glamour shots!


No metal showing.

and finally Slightly distressed.

Thank you again to my beautiful nieces for modeling for me, aren't they gorgeous! 
Darling, simple to make, and great on the pocket book!!

Will you try these?  What do you think?


Linking to:  Sew Much Ado