Tuesday, December 27, 2011

Hobby Lobby Deals 12/26-12/31


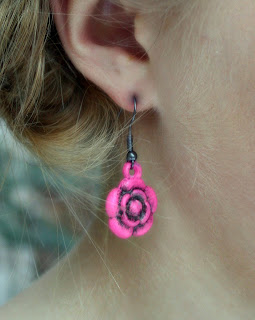
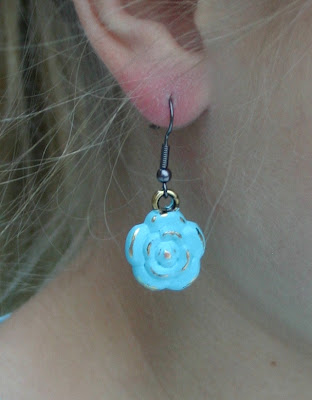
I wanted to give you a heads up, the filigree and rosette charms that I used to make these earrings are 50% off at Hobby Lobby this week.


 This is a great time to buy them!!  The sale rotation for Hobby Lobby is usually every 4 weeks, after this week it will be another 3 weeks until they are on sale again!

Hope you had a wonderful Christmas!!

Tuesday, December 20, 2011

Buffet Update

A while back I posed the question of whether or not to glaze a buffet.  I decided to try to glaze and when that didn't work--then to dark wax it and it did not turn out well.


The finish on the doors was not perfectly smooth, so it just brought out all of my sanding marks, and brush strokes.  It looked scratched and dirty.  So I cleaned it and repainted, again.  She'll just have to stay white.  And in the end she really is gorgeous and I love her just the way she is!


Thank you for all of your advice and wisdom!  Next time I promise I'll clean my garage our before I take a picture.  Yikes!


Girl's Rosette Earrings

So today I have to start by saying how amazed and grateful I am that my little blog now has reached 66 followers!  I am humbled and happy to have you here visiting with me!!  Thank you for your kind comments and new friendships!! 

Today I have a new earring idea for you!  These are cute, so simple and inexpensive!  They would be perfect for last minute stocking stuffers or gifts for girls!  Aren't they cute!!  Thank you to my awesome nieces for modeling them for me. 


Your Supplies:
Acrylic Paint
Glaze with black paint or Martha Stewart Metallic Glaze (black coffee color)
Painting Sponges
Earring Hooks
Extra wires for dipping

Metal covered plastic beads (I bought these at Hobby Lobby for 50% off  for $1 but regular price they are $1.99 for 9)


To make the pink glazed earrings I just followed the step by step using the Martha Stewart glaze instead of the black/glaze mix and this tutorial.


To make the turquoise earrings I first dipped straight into the paint tube.


Shake the excess paint off and let them dry.   If I were to do this again, I would have taped off the top loop to show the metal instead of blue.


Once they were dry I scraped the edges and top loop with a razorblade.

And... tada...


Or you can just put the charms on a hook -- no work required!


Now for the glamour shots!


No metal showing.

and finally Slightly distressed.

Thank you again to my beautiful nieces for modeling for me, aren't they gorgeous! 
Darling, simple to make, and great on the pocket book!!

Will you try these?  What do you think?


Linking to:  Sew Much Ado

Thursday, December 15, 2011

Teacher and Neighbor Gifts

I always like to keep Christmas Gifts as simple as possible.  This year our teacher and neighbor gifts will be the same gift!  A few months ago I was clicking around Pinterest and saw a recipe for Nutella Hot Choclate and was instantly in love.  Yum!!  I have family who live in New Zealand and Nutella is a staple over there, and here at our house.  But as Hot Chocolate?! Can I hear a "hip hip!" This recipe
(although very decadent) is now one of our favorite treats and we can't wait to share it with our neighbors and our children's teachers.


This Gift includes:
  • A cereal or soup bowl-the best price I found on these was at the $ store but only in colors black or green, which are great! I bought mine at Ross in a 4 pack for $7 and Fred Meyer for $2 each
  • A small container of Nutella.  I found these for 3/$7.88 at Sams Club
  • Baggies of Marshmellows (Just stapled shut)
  • 2 Red and white paper straws.  I found mine at a local restaurant supply store.
Tie with a ribbon and attach with tags, one with greeting and the other with THE Recipe.


My 4 year old wanted to make sure I got a picture of the marshmellows (His favorite)


I wanted the tag to have a line so that my kids could write their own names, it is more personal that way, doncha think?  Below are graphics of my tags, feel free to save or print yourself!


This is my favorite type of gift, simple, pretty, and delicious. 

As a parting note my sister, mom and I wanted to come up with a clever line or rhyme, but didn't succeed.  Feel free to laugh or roll your eyes at the ones that didn't work out:

"Forget a cup of cheer, Grab a bowl!  Merry Christmas!"
"We are nuts about you!  Merry Christmas!"
"Your nuts for being our neighbor! Oh wait you didn't have a choice. Merry Christmas!"

Some that we found on the internet were:
"Fall in love? I'd rather fall in chocolate."
"My blood type is Nutella"


Okay maybe they aren't that funny but wait until you are really tired, they get funnier, I promise!

Thanks for the visit!


Tuesday, December 13, 2011

Awesome Gift Artisan Earrings

A couple of months ago my sister-in-law and I went to this great boutique where we found these beautiful colorful earrings!!  We were grabbing pairs and pairs when I started looking at them more closely, and you know me, I of course said "Hey, we can make these!"  And make them we did (after buying several pairs to wear until ours were finished!)  My sister-in-law and I painted 15 pairs in an hour and for less than $20 for all!!  They are going to be the perfect friend gifts, for not only her friends but also her teenage daughter's friends!!  At close to a $1 a piece, you really can't beat them!  The charms we bought at Hobby Lobby for 50% off  About 1.50 for 4!  The earring hooks we also found at Hobby Lobby for a couple bucks.  Thanks to my beautiful sister-in-law for modeling!

On to the tutorial...

Supplies:
  • Foam sponges (at least 3)
  • Charms
  • Earring hooks (These are kidney shaped) 
  • Acrylic Paint -- Enamel is great, but any acrylic will work  Also if doing them all one color you can use spray paint too!
  • Black Acrylic Paint
  • A Mixing Glaze (I had the Valspar glaze ($15) on hand from furniture refinishes, but you can also find smaller versions at local craft stores) 
  • Polyacrylic to seal <Not pictured>
Step 1:  Paint acrylic paint over charm


 Step 2:  Apply second coat of acrylic paint -- Check the back of the charms, if paint has bubbled paint back side too!


 Step 3:  Let paint dry, if using enamel paint they looked great at this stage and really if you are using enamel paint you could leave them like this.


Step 4:  Mix equal parts of black acrylic paint and mixing glaze 

Step 5:  Using a foam brush glaze mix over charms


Step 6:  Using a damp paper towel carefully wipe off, wiping gently to not remove all of the black, wipe off glaze that may have puddled on back.


Step 7:  Let the glaze dry, grab your sealer or polycrylic


Step 7:  Brush polyacrylic over the tops


Step 8:  Let dry and put them on the earring hooks


Now for the step by step pictures of our 15 pairs, we made in an hour!


The pictures below are pictures of the charms glazed and unglazed!


All done and ready to be given!


Again more modeling pictures!


Not glazed (Butterflies)


I love them all!!  Do you have a favorite?   They were so inexpensive, they are light weight, original and beautiful!!  Thanks again to my beautiful sister in law for letting me take her picture with every color!

Thanks for visiting!!


A HUGE Thank you to Kari at UCreate for featuring!!